
We get asked about photographing jewelry a lot and have many thoughts on the subject!
These tips are perfect for you if you are a DIY photographer looking for product photography tips for your small business, or a professional product photographer who wants to deliver the highest-quality product photography to your clients. While these tips focus on jewelry, they will work great for any products, especially ones that are smaller size.
Before we dive into the different approaches you can take to this type of product photography, though, you need to answer some questions:
•First, what is the overall vibe of your jewelry brand? Is it elegant and refined? Funky and artistic? Focused on vintage designs? You need to define this first before figuring out how best to represent your product.
•Second, what makes your brand special? Do you focus on sustainability in your sourcing? Do you specialize in custom pieces? Becoming clear about what sets your brand apart helps you determine the best way to market your jewelry.
•Third, what colors best represent your brand? Is your brand soft and muted? Or are you more bold and dramatic? Deciding on a color palette is key to making sure your final images look cohesive.
Once you are clear on the message of your brand, it's much easier to choose how you want to represent it. For example, if your company makes handcrafted pieces inspired by the natural world, it would make sense to incorporate some of that in your images: choosing wood or stone photo surfaces, including elements from nature as props, etc. However, if you focus on high end engagement rings, you may want to stick with simpler photo backgrounds, like classic marble, and keep your props minimal. Or maybe you'd skip using a photo surface altogether and use models for all your shots instead.
So, with that in mind, here are 4 easy approaches to photographing jewelry:
1. Simple & minimal: skip the props, pick a photo backdrop that fits your product and snap away.
This is the easiest approach and, oftentimes, the most impactful. Focus on close up, straight-on shots so that your viewer can see all the details of your product, and make sure to capture all the angles of the pieces, (side, front, etc.) Make sure your light is spot-on (here is a good post showing how to use natural light and shoot your product at home) and definitely think about your aperture. Shooting with lots of bokeh is gorgeous but you also want to make sure your customers can see all the details of your pieces, so make sure your F-Stop is high enough to have an adequate depth of field.
Check out these beauties from our friends at WR Metal Arts, shown on our Clay Surface:


Or these gorgeous pieces by Allison Korn Designs, shot on our Nina Surface,
(photo credit to Allison Korn):


Some of our favorite light & airy photo surfaces for simple jewelry shots are Betty, Clay, Eve and Dorothy. If you want a darker vibe in your backdrops, we LOVE Zane, Nina and Luca.
2. Incorporate some props.
Here are some prop ideas:
• Items from nature, like flowers, bark, plants, rocks, crystals, shells-- these are all amazing props to include in jewelry photography. One of my favorite jewelry designers, Cara Wolff, often shoots her pieces outdoors, on stones or pieces of wood and the effect is GORGEOUS. Alternatively, you can pick a photo surface to shoot on and use natural elements as supporting characters in your images, like the shots below.
In addition to adding beauty and interest to your images, items from nature add height, dimension and additional texture to your photo, which is always a good thing.


Or you can skip the photo backdrop altogether and just place your pieces on plants, stones or other beautiful items from nature, like below:


• Items that add layers and texture, like paper or fabric. This can be a great way to further tell your story as a brand. For example, if you sell vintage pieces then incorporating items that have some history to them can really add some visual interest to your images.


• Food! It may seem odd but fruit, herbs, salts, etc all can be beautiful props to include in a jewelry photo.
In the first image below, the colors of the pears play off of the tones in the necklace and bracelet. I also like how the curving shapes of the fruit mirrors the organic shapes in the jewelry.
In the second image, pink Himalayan salt was piled on top of our Grace Surface and the gorgeous labradorite necklace was placed on top of that. It's a super simple and quick set-up and yet it's effective, as the color and texture of the salt sets off the color and angles of the stone.
In the last shot, I wanted to incorporate the stunning color of those grapes and not make them so obvious that they distracted from the bracelet. So, I shot at a low f-stop, making the grapes recede into the background. Your eye goes right to the jewelry, which is set off beautifully by the rich purple of the fruit behind it.


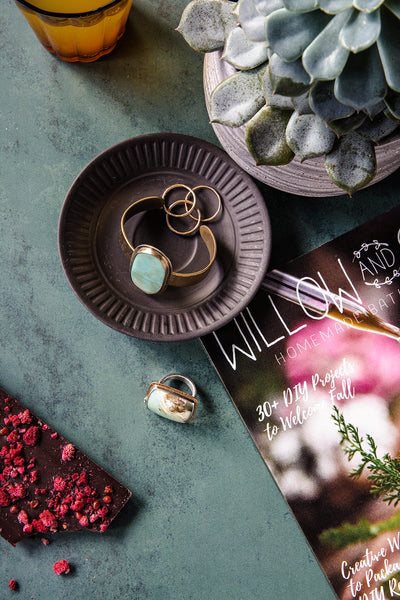
3. Create a visual story.
I love taking an editorial approach to photographing jewelry. Instead of focusing solely on your products, you incorporate your pieces into a scene, which sets a mood and engages your viewers on another level. Telling a visual story with your products is a way to connect with the your ideal customers, by including real-life "props" (plants, cosmetics, books, a cup of coffee, etc) that may also appeal to the people who'd be purchasing your products.
Have you ever designed a customer avatar for your business? It's an incredibly helpful way to figure out who, exactly, you are marketing to. For example, let's go back to our theoretical company that designs high-end engagement rings with a focus on sustainable sourcing. They focus primarily on custom work and charge a premium price for it. Knowing these few facts about the brand, we can already form a picture of their ideal customer: they're most likely in a higher income bracket, (ie: can afford this company's prices) has discerning taste (wants a custom piece) and is choosy about where they spent their money (will care about the sustainable sourcing practiced by this business.) With this information, the business can start to flesh out their customer avatar (what do they read? Where do they shop? What are their hobbies?) and fine tune their marketing to appeal to that ideal customer.
Creating a visual story in your photos is a GREAT way to appeal to your people. Since you already have a good idea of what your customers like, you can create images that will really speak to them.

4. Incorporate people.
Use models, friends or your own hands-- just show your pieces on human beings. This is effective for multiple reasons:
•It shows the scale of your jewelry
*Similar to the editorial product shots described above, photographing your jewelry on models is another way you tell a story and target your ideal customer.
•It adds warmth. Incorporating people makes your images more relatable and real, as opposed to traditional product photography, which is much less personal.
Check out these magical shots by Cara Wolff:


And this lovely series by Ann Chikahisa:


Thank you for reading our tips on photographing jewelry! I hope it helps in making your product photos even more impactful.
If you haven't already done so, go and take our quiz on finding your unique photo style. We include personalized surface recommendations, some helpful tips AND a special gift for all our quiz takers! 😃
Leave a comment